 squirrelworks

The Squirreworks Proxmox environment is hosted on a professional-grade HP Z440 Workstation, a chassis renowned for its thermal efficiency and expandability. At the heart of this system is an Intel Xeon W-2133 @ 3.60GHz. While the original Z440 line often featured the [E5-1650 v3](https://www.cpubenchmark.net), this server-class processor provides a robust 6-core/12-thread foundation for simultaneous VM operations.
The Xeon architecture is specifically designed for 24/7 reliability, making it an ideal choice for a home lab hypervisor. With a base clock of 3.60GHz and a high multithreaded benchmark rating, it ensures that even resource-heavy Windows VMs remain responsive during peak utilization.
The system is equipped with 32 GB of RAM, providing sufficient "headroom" to run the current mix of Linux Mint and dual Windows VMs. This capacity allows for comfortable resource over-provisioning without triggering the "Out of Memory" (OOM) killer on the Proxmox host. For stability, this workstation typically utilizes ECC (Error Correction Code) memory to prevent data corruption during long-term uptime.
Graphics are handled by an Nvidia Quadro K1200. This professional-class GPU is optimized for stability and supports multiple 4K displays, which is highly beneficial for local console management, although this will be primaly accessed via browser from my workstation. (I have a 21" attached, so commands can be run locally if needed).
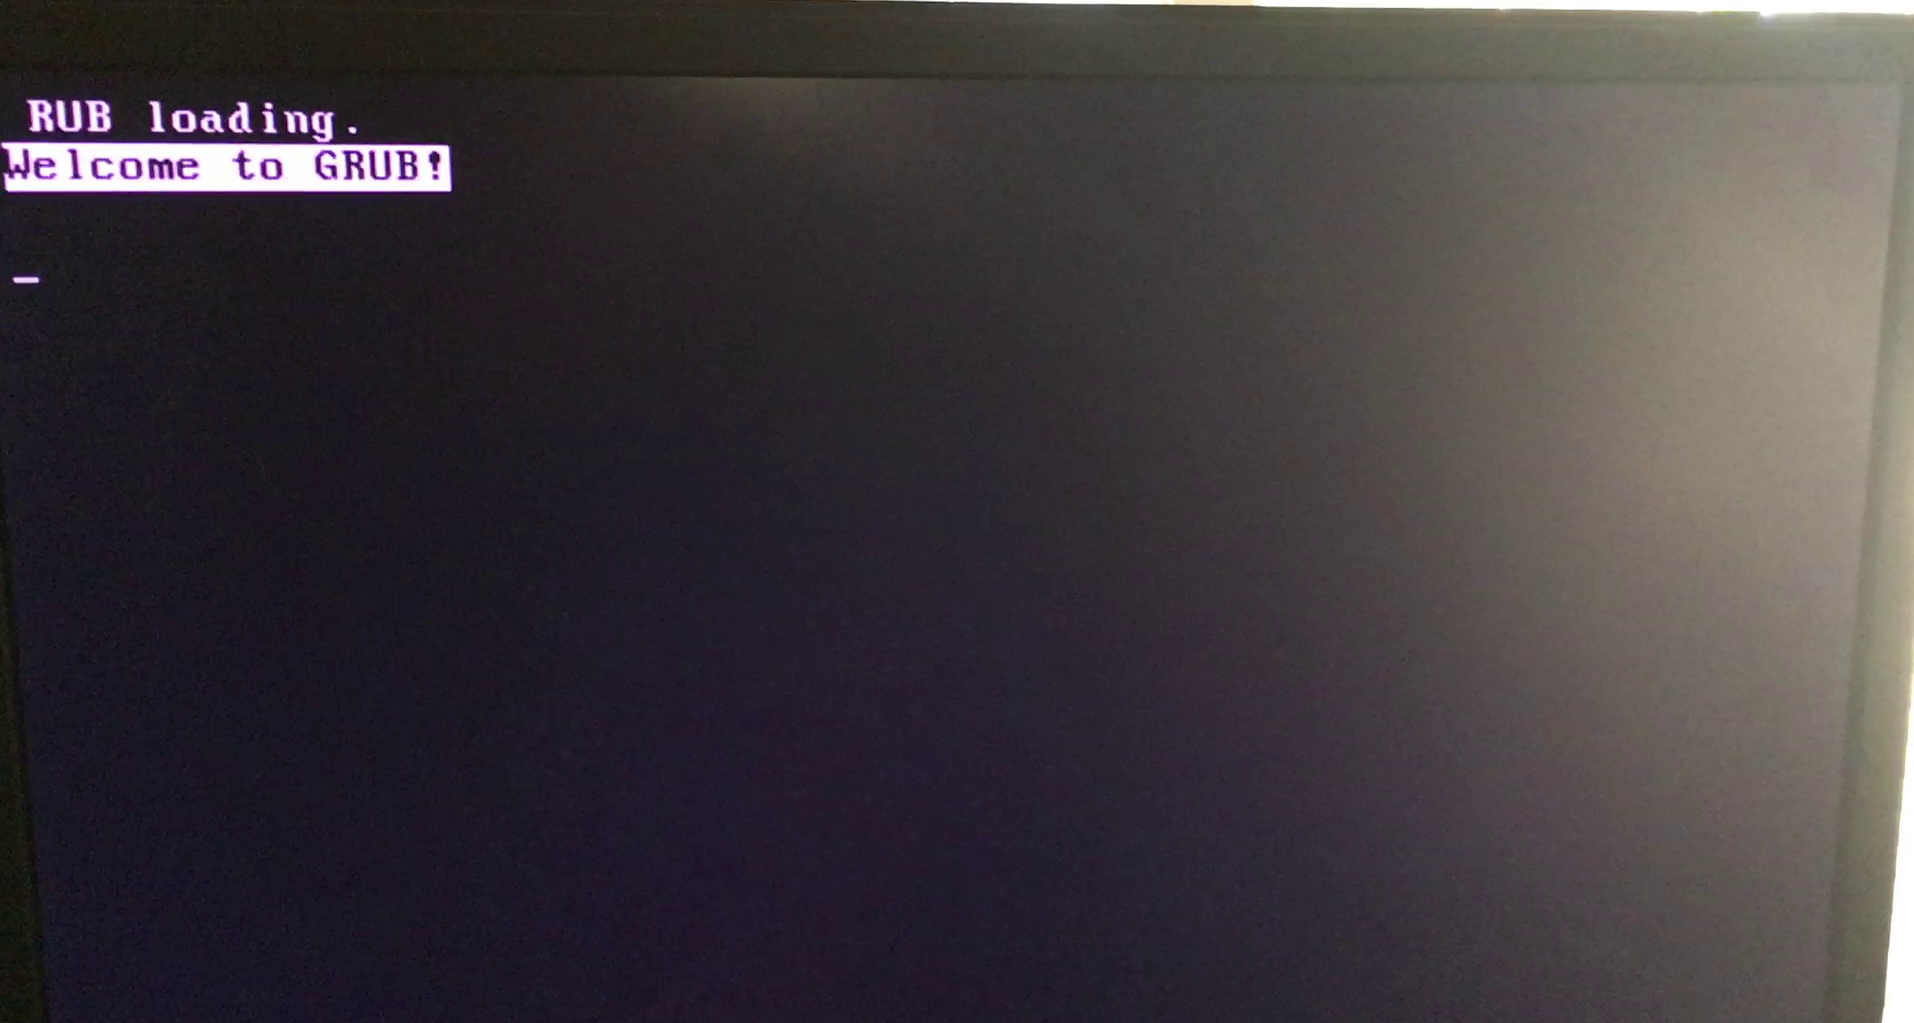
In future project phases, this card could potentially be used for GPU Passthrough, allowing one of the virtual machines to access raw hardware acceleration for tasks like video transcoding or 3D rendering.During the very first attempt to launch the Proxmox installation from USB, the process was immediately halted by a critical bootloader error: error: symbol 'grub_disk_native_sectors' not found. This error is a classic symptom of a GRUB version mismatch. It occurs when the initial boot code on the USB drive tries to call a specific function (the "native_sectors" symbol) that its associated modules cannot find or recognize.

Because the HP Z440 was operating in its factory-default Legacy BIOS mode, it was highly sensitive to how the bootloader was written to the installation media. The initial media creation attempt resulted in a "broken" handshake between the BIOS and the GRUB bootloader, leaving the system stuck in a grub rescue loop before the installer could even load.
The breakthrough occurred after identifying a known compatibility issue with older versions of image-writing software. While Rufus 3.13p failed to properly map the modern Proxmox GRUB requirements, switching to Rufus 3.14 resolved the conflict. This specific version of Rufus included updated binaries and improved "DD Image" mode handling that correctly aligned the native_sectors symbols for legacy hardware.


Resource: AskUbuntu: Resolving GRUB Symbol Mismatches
By simply updating the media creation tool to version 3.14, the Proxmox installer was finally able to initialize without any changes to the workstation's firmware. This confirmed that the HP Z440 could remain in its preferred Legacy Enabled / Secure Disabled state while still successfully hosting a modern 64-bit hypervisor. With the bootloader mismatch resolved, the installer proceeded to successfully partition the Micron SSD and finalize the PVE host deployment.

When Rufus asks how to write the image, DD Mode is often the "secret sauce" for Proxmox. Unlike ISO mode, which tries to format the USB as a standard drive, DD mode creates an exact, block-by-block clone of the installer, which is far more reliable for Legacy BIOS systems like the Z440.
To manage the Proxmox host more efficiently, a remote connection was initiated from a Windows 10 workstation using SSH (Secure Shell). Upon the first connection attempt to root@192.168.0.100, the system presented a security warning regarding the "authenticity" of the host.

This is a standard security protocol known as Trust on First Use (TOFU). Because the workstation had no prior record of the Proxmox server's public key, it required manual verification of the ED25519 fingerprint before proceeding. This ensures that future connections are verified against a known "digital signature," protecting the lab from potential interception or spoofing.
ED25519 is a modern public-key signature system used by SSH to secure your connection. Unlike older standards (like RSA), it is incredibly fast, offers high security with very small keys, and is resistant to many types of cryptographic attacks. In your Proxmox setup, it acts as the "digital seal" that proves your workstation is talking to the real server.
By confirming the connection with a "yes" response, the server's unique SHA256 fingerprint was permanently added to the workstation's local known_hosts file. This creates a secure, trusted link between the management station and the hypervisor.
This step is a foundational part of server hardening. It moves the project beyond basic web-GUI management and opens the door for advanced command-line automation and the use of the Proxmox Helper Scripts mentioned in previous milestones.

The known_hosts file on the management workstation serves as a local database of verified server identities. When a connection is first established, the workstation "pins" the server's Public Key Fingerprint to its specific IP address.
On subsequent logins, the SSH client performs a handshake to verify that the server's current key matches the stored record. This cryptographic check is the primary defense against Man-in-the-Middle (MITM) attacks, where a malicious actor might intercept traffic by pretending to be the destination server.
The REMOTE HOST IDENTIFICATION HAS CHANGED warning was triggered because the Proxmox host presented a new ED25519 fingerprint that conflicted with the previously cached version. In this lab environment, this was likely due to a server reset or an IP conflict on the local network.
Since the server's "identity" was regenerated, the workstation viewed the connection as high-risk. Resolving this required manually clearing the old entry, which signals to the workstation that the change was intentional and the new "identity" of the Proxmox host can be trusted as the new baseline.
After successfully establishing the initial SSH connection at 22:04, the session remained idle for approximately 31 minutes. At 22:35, the Proxmox host issued a closed by remote host command.
This is a standard behavior of the OpenSSH Daemon (sshd). To prevent "ghost" sessions from consuming resources and to minimize the window for unauthorized access, the server is configured with ClientAliveInterval and ClientAliveCountMax settings that automatically reap inactive connections.
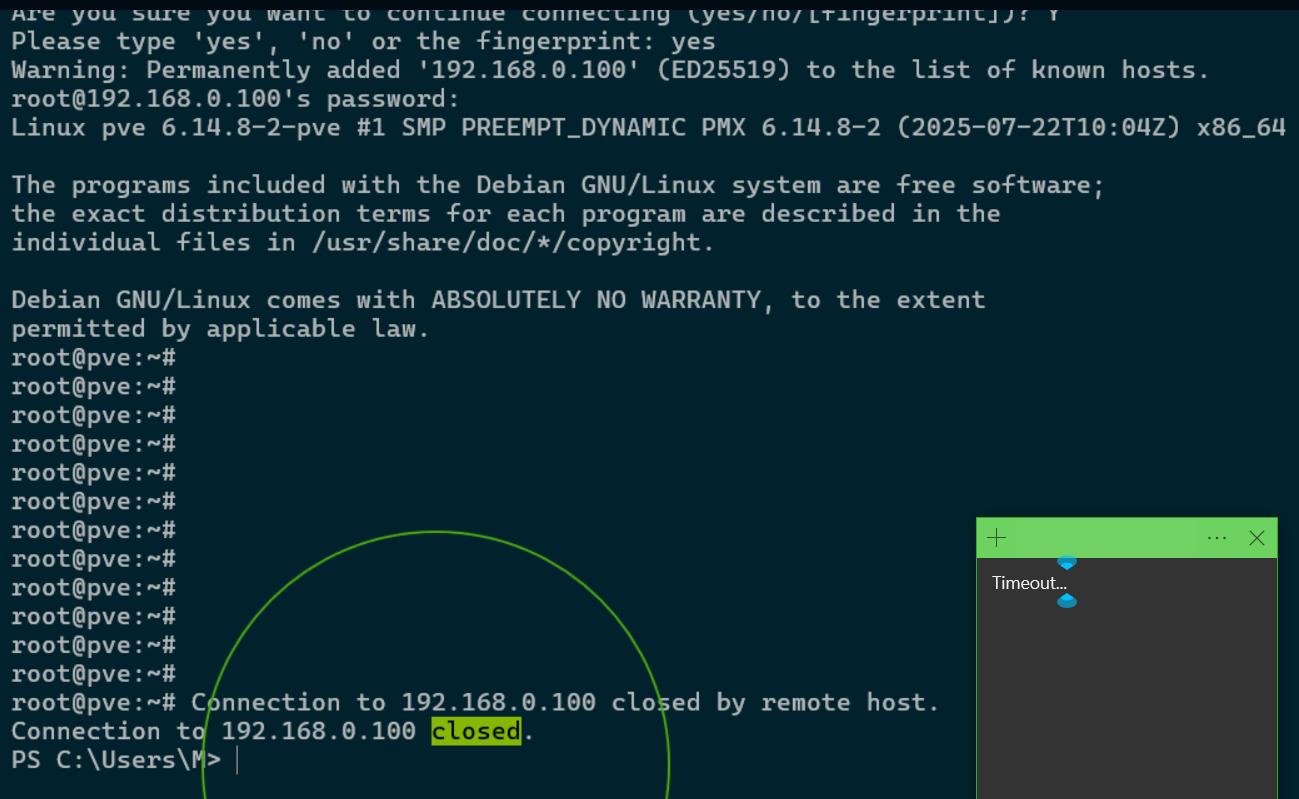
The most significant event occurred during the reconnection attempt. Despite the IP address remaining constant, the workstation flagged a Remote Host Identification Change. Since no IP conflict was present, this indicates the Proxmox host regenerated its SSH host keys.
This "identity reset" is common in fresh installations where the initial keys are treated as temporary. Upon a system restart or the completion of a first-boot configuration script, the server generates a permanent ED25519 signature. While this triggered a security warning on the workstation, it ultimately represents the server finalizing its unique cryptographic identity.
During a secondary connection attempt, the workstation issued a critical Security Warning indicating that the REMOTE HOST IDENTIFICATION HAS CHANGED. This occurs when the cryptographic fingerprint stored in the local known_hosts file no longer matches the key currently being presented by the server at 192.168.0.100.

In a laboratory setting, this is typically caused by a server reinstallation or an IP address conflict where two devices are competing for the same network identity. Because the server's identity was technically "new," the workstation blocked the connection to prevent a potential security breach.
To resolve this and regain access, the outdated key must be purged from the workstation's local cache. This is handled by running the following command in the terminal:
ssh-keygen -R 192.168.0.100This command clears the "stale" entry, allowing the workstation to treat the next login attempt as a "first-time" connection. Upon reconnecting, the new ED25519 fingerprint is presented and accepted, restoring secure access to the Proxmox root@pve shell.

It's hard to see in the image, but I'm using the -R flag known_hosts file associated with that IP address. This is much safer than manually editing the file, as it prevents accidental deletion of other trusted server keys.
When connecting to the Proxmox host, the SSH client displays a SHA256 fingerprint. This string is a "cryptographic hash"—a condensed, one-way representation of the server's public key. Its primary role is to provide a human-readable way to verify that the remote server is exactly who it claims to be before any data is transmitted.
By displaying the full string, the SSH protocol allows for out-of-band verification. A security-conscious administrator can compare the fingerprint shown in the terminal against the one generated directly on the server console. If even a single character in the string differs, the connection should be treated as compromised.
SHA256 (Secure Hash Algorithm 256-bit) is a cryptographic function that takes an input and produces a unique 64-character signature. It is "deterministic," meaning the same server key will always produce the same fingerprint, but it is "one-way," meaning you cannot recreate the original key just by looking at the fingerprint.
While manually verifying a fingerprint is sufficient for a home lab, enterprise environments require more scalable solutions. System administrators often utilize SSHFP (SSH Fingerprint) records stored within a secured DNS infrastructure. This allows the SSH client to automatically validate the server's identity against a trusted public ledger, eliminating the "Trust on First Use" prompt entirely.
In larger infrastructures, SSH Certificate Authorities (CA) are employed. Rather than trusting individual host keys, the client is configured to trust any host key signed by the organization's private CA. This creates a seamless, "zero-touch" verification process that remains secure even as servers are scaled or replaced.
For internal documentation, admins rarely use plain text files. Instead, verified fingerprints are stored in encrypted credential managers or secure internal wikis. This ensures that every team member has access to the "source of truth" for the server's identity, preventing accidental acceptance of a fraudulent key during a known_hosts mismatch.
To streamline the login experience, the No Valid Subscription prompt was disabled by modifying the Proxmox internal JavaScript. This required navigating to the /usr/share/javascript/proxmox-widget-toolkit directory and using nano to edit proxmoxlib.js.

By altering the conditional logic that triggers the Ext.Msg.show alert, the interface was "instructed" to bypass the subscription check upon login. This is a common practice in the home lab community to maintain a clean UI while utilizing the No-Subscription Repository.
Resource: Let's install Proxmox 8.3 in 2025: From Scratch. Spelled out. - Digital Mirror on Youtube

After the file modification, the web proxy was restarted using the command:
systemctl restart pveproxy.serviceIt was noted that the browser initially retained the old "cached" version of the script, causing the prompt to appear one final time. A complete browser session reset successfully cleared the cache, fully implementing the changes and ensuring a "nag-free" management experience for future sessions.
The pveproxy.service is the Proxmox "web proxy." It acts as the gatekeeper between your browser and the hypervisor, serving the Web GUI over port 8006. It handles the API calls and the JavaScript files that build the interface you see. Restarting this service forces Proxmox to stop using its current memory and reload the modified proxmoxlib.js file directly from the disk.
This restart is the final step in the subscription bypass. Because the "No Valid Subscription" alert is triggered by the code within the proxmoxlib.js file, the web proxy must be refreshed to stop serving the original, "nag-enabled" script to your browser. Until the service is restarted and the browser cache is cleared, the system will continue to display the old license warning from its active memory.
Because UI modifications are made directly to system files, they are not persistent through major updates. If the proxmox-widget-toolkit package is updated by the server, the modified file will be overwritten. This requires reapplying the "nag removal" edit as part of a recurring post-update maintenance workflow.
To ensure the system receives updates without a paid license, the Enterprise Repositories were disabled in favor of the No-Subscription tiers. As seen in the configuration screens, both the standard PVE and Ceph Squid repositories were set to the "No-Subscription" path.


While Proxmox displays a warning that these repositories are "not recommended for production use," they are the standard for home lab environments. They provide access to the latest packages and security patches, though they lack the rigorous "pre-testing" provided to enterprise-level subscribers. To verify the active repositories via the terminal, the following command can be used:
cat /etc/apt/sources.listThe update cycle was initiated through the Proxmox web interface, triggering the apt-get update command. The terminal output confirmed a successful fetch of package metadata from the configured repositories (Get 1 through Get 7), culminating in a TASK OK status.


This phase is critical for ensuring the local package database is aware of the most recent security patches and software versions available in the No-Subscription Repository. It prepares the system for the subsequent dist-upgrade phase, which handles the actual installation of new binaries.
To finalize the system updates, a host-level reboot was performed directly from the Proxmox management console. This resulted in a complete power cycle of the physical hardware, which is the standard requirement for applying Linux Kernel updates.
Unlike virtual machines, which can often be "soft" rebooted, the hypervisor requires a full hardware restart to switch to the newly installed kernel. This ensures that the entire virtualization stack—including KVM and LXC—is running on the latest, most secure foundation provided by the Proxmox developers.
Upon logging back into the web interface, a manual "Refresh" was performed. It was observed that Proxmox initiated a new check for updates immediately. This is expected behavior, as the system verifies its status against the remote repositories at the start of each new management session to ensure no new critical patches were released during the reboot window.

The Proxmox host is powered by a single 480GB SSD Micron M600 512GB SATA 6Gb/s SSD (identified as sda), a common high-performance upgrade for the Z440 in it's day.
This drive provides the high IOPS (Input/Output Operations Per Second) necessary to run multiple virtual machines simultaneously without the latency bottlenecks of traditional platter hard drives.
An audit using the lsblk command confirms the drive is divided into three primary partitions: a small boot partition, an EFI system partition, and a large LVM (Logical Volume Manager) partition that houses the host OS and all virtualized data.
The system utilizes a Thin Provisioning strategy to maximize the 480GB capacity. The pvesm status command reveals two primary logical pools:
This configuration currently supports five distinct virtual disks for the Linux and Windows VMs. By using thin provisioning, the system allows for "over-provisioning"—assigning more virtual space to VMs than physically exists—while only consuming actual disk sectors as the data is written by the guest operating systems.
The system's primary storage was identified as a Micron M600 512GB SSD (MTFDDAK512MBF). A comprehensive S.M.A.R.T. audit confirmed an overall status of PASSED, with the drive operating at a stable 33°C. To pull this information, the following command was executed:
smartctl -i /dev/sdaAnalysis of the Average Block-Erase Count (ID 173) reveals that the SSD retains approximately 89% of its original life. This indicates that while the drive has been in service for several years (52,407 power-on hours), it has only consumed a fraction of its rated write endurance. The full attribute table was generated using:
smartctl -A /dev/sdaWith zero logged errors and a clean self-test history, the Micron M600 is well-suited for the high-I/O demands of the Proxmox hypervisor. To run a fresh "short" self-test and verify these results manually, the following command can be used:
smartctl -t short /dev/sdaThe M600 uses Dynamic Write Acceleration technology. This allows the drive to switch its NAND cells between SLC and MLC modes on the fly to provide faster bursts of speed, which helps Proxmox feel snappier when starting up multiple VMs at once.
The Intel Xeon E5-1650 v3 was audited using the coretemp driver. The Package Temperature was recorded at a stable 47.0°C under idle conditions, well below the critical threshold of 95.0°C. Individual cores are hovering around 40.0°C, indicating an efficient thermal bond between the heat spreader and the Z440's active cooling solution.
# View CPU and GPU temps
sensorsThe Nvidia Quadro K1200 (monitored via the nouveau driver) is operating at 43.0°C. Despite the small form factor of this workstation card, the fan is maintaining a steady 3060 RPM (12% PWM duty cycle). This indicates the card has significant thermal headroom should it be utilized for hardware acceleration or GPU passthrough in future stages of the lab.
To ensure these metrics are available after every system restart, the coretemp module was appended to /etc/modules. This allows the Proxmox host to automatically initialize the thermal sensors upon boot, facilitating continuous monitoring via the CLI or integrated dashboards.
The sensors-detect output identified your CPU as an E5-1650 v3 (Haswell-EP). While both are powerful 6-core chips, the E5-1650 v3 is the native processor for the Z440's LGA 2011-3 socket, offering high memory bandwidth that is excellent for virtualization performance.
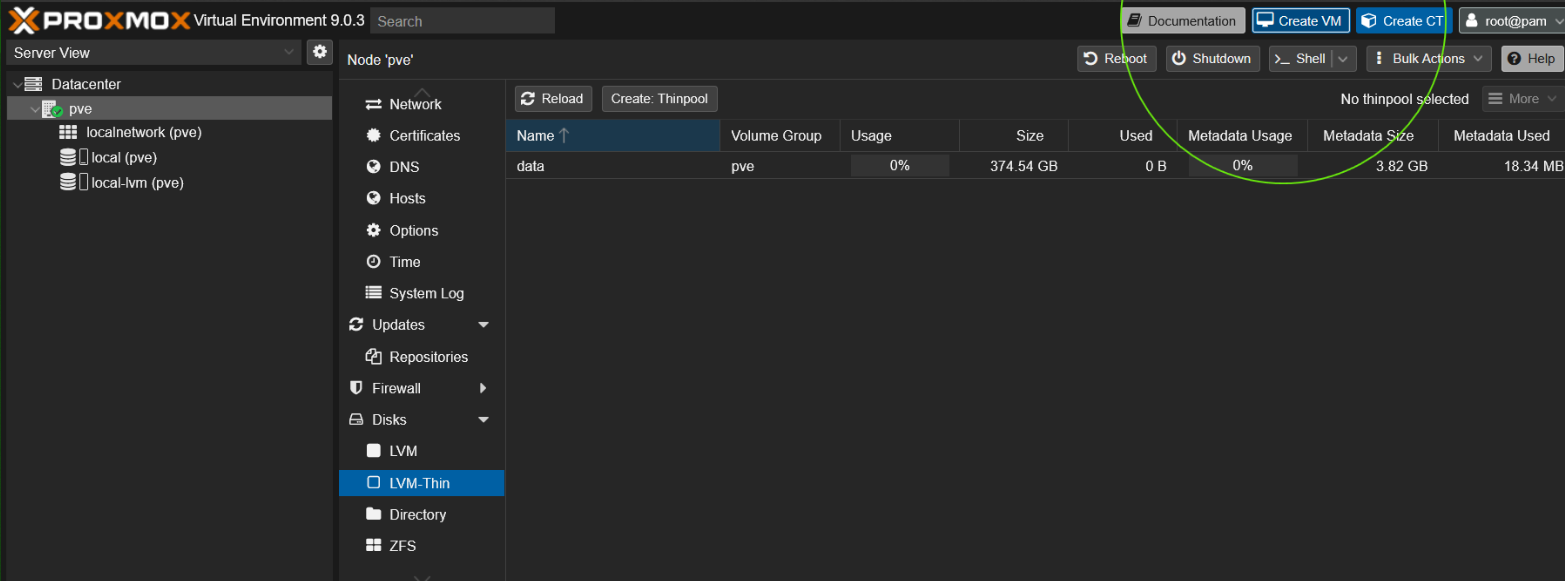
In the Proxmox web interface, the Disks section under the node provides a high-level overview of the physical hardware. Initial attempts to manually create a "Directory" resulted in a no disks unused error. This occurred because the Proxmox installer had already claimed the entire 480GB Micron SSD during the initial setup phase, leaving no "raw" unpartitioned space for manual formatting.

This led to a key realization: on a single-drive system, you do not manually partition the physical disk after installation. Instead, you utilize the logical storage structures that the installer creates automatically to manage your Virtual Machines and ISO files.
The Proxmox installer uses a layered Logical Volume Manager (LVM) approach to maximize the utility of a single drive. During the automated setup, the SSD is divided into a single Volume Group (typically named pve), which is then carved into three distinct functional areas:
local) where the Proxmox OS, ISO images, and templates reside.local-lvm) specifically engineered for virtual machine disks.Choosing LVM-Thin for the first VM deployment was the correct strategic move. Unlike standard LVM, which allocates the full disk size immediately, LVM-Thin uses thin provisioning. This allows a 100GB virtual disk to consume only the actual blocks written to the physical SSD, preserving space for other VMs and enabling the use of Snapshots—a critical feature for testing and recovery.
The primary takeaway from this phase is that Proxmox is fully functional on a single drive, provided the administrator works within the logical partitions established during setup. While alternatives like ZFS offer advanced data integrity, they generally require multiple disks and higher RAM overhead. For the HP Z440 lab, the default LVM-Thin configuration provides the optimal balance of performance and flexibility.
LVM-Thin allows for "over-provisioning," meaning you can assign more virtual disk space to your VMs than you have physical SSD capacity. While powerful, this requires diligent monitoring; if the physical pve-data pool hits 100% usage, all VMs will freeze as they run out of actual hardware sectors to write data to.
Upon attempting to launch the first test virtual machine, titled "First," the Proxmox status pane returned a critical task error: KVM virtualisation configured, but not available. This indicates that while the Proxmox software is ready to host VMs, the underlying Intel Xeon E5-1650 v3 hardware was not currently permitting the hypervisor to access its virtualization extensions.
In an attempt to reset the node's state, a Bulk Shutdown was initiated at the Datacenter level. However, the host failed to respond to the software signal, requiring a manual hard-reset via the physical power button. This lack of responsiveness is common when the ACPI (Advanced Configuration and Power Interface) services are not yet fully integrated or when the host is hung on a virtualization-related sub-process.
The root cause was identified within the HP Z440 BIOS settings. By immediately pressing F10 during the reboot, the Security > System Security menu was accessed to enable the following critical features:
Following the BIOS update, the "First" VM successfully transitioned to a "Started" state. While the VM currently lacks an operating system image and remains at a boot error, the KVM hardware handshake is now functional. This test VM has served its purpose by confirming that the host is now capable of hardware-accelerated virtualization, clearing the path for the deployment of functional Linux and Windows nodes.
Many enterprise workstations like the HP Z440 ship with VTx disabled by default as a security measure to prevent unauthorized "nested" environments. Once enabled, the E5-1650 v3 can utilize its 12 threads to efficiently distribute workloads across your virtual fleet.
The project began with the successful installation of Proxmox Virtual Environment (PVE) on bare-metal hardware. Currently, the environment is running in a standalone (single-node) configuration, managed under the primary "pve" datacenter node.
To establish the lab's core utility, three initial virtual machines were deployed: one Linux Mint instance for open-source testing and two Windows VMs for application compatibility and specialized workloads.
To improve communication between the host and the guest, the QEMU Guest Agent was integrated into the Linux Mint VM. This was achieved by executing sudo apt install qemu-guest-agent within the Mint terminal.
This step is critical for allowing the Proxmox host to perform "graceful" shutdowns and to accurately report the VM's internal IP address directly to the management dashboard.
After the internal software installation, hardware flags were updated within the Proxmox Options menu to enable the Guest Agent interface. By toggling this setting and performing a full power cycle of the virtual machine, a successful "handshake" was established.
The Proxmox Summary tab now provides real-time networking data and enhanced snapshot capabilities, ensuring file system consistency during future backup operations.
The environment is currently stable, with the Linux Mint node fully optimized. The next phase involves similar optimizations for the Windows VMs.
This requires mounting the ISO as a virtual CD-ROM to install the virtio-win-guest-tools.exe. These drivers are essential for Windows to properly interact with virtualized hardware, specifically providing high-performance VirtIO SCSI disk and NetKVM network adapter support.
One of the earliest discoveries in this project was that a Virtual Machine is not truly "aware" of its environment by default. Without the QEMU Guest Agent, the Proxmox host is essentially "flying blind" regarding the internal state of the guest OS.
This results in inaccurate reporting of network status and, more dangerously, "hard" shutdowns that can lead to data corruption. Learning to install and enable this agent early in the deployment process has now become a standard part of my VM provisioning workflow.
A key technical takeaway was understanding the two-step verification required for Proxmox features. Installing the software package (the .deb or .exe) inside the guest is only half the process; the virtual hardware "flags" must also be toggled in the Proxmox Options menu.
I also learned that hardware-level changes in Proxmox often require a full power cycle (Stop and Start) rather than a simple OS reboot to take effect. This distinction is vital for troubleshooting future hardware passthrough or configuration changes.
Managing a mix of Linux and Windows VMs provided immediate insight into resource overhead. While the Linux Mint VM is relatively lightweight, the two Windows instances require significantly more RAM and CPU cycles to remain responsive.
This has highlighted the need for careful capacity planning as I look toward adding more services to the single "pve" node. It ensures that every node in the lab can be managed safely and predictably from the central dashboard.